Unlock the potential of your OpenWRT router by following our comprehensive installation guide for Passwall VPN. In this guide, we demystify the setup process, catering to users of all levels of technical expertise.
Are you concerned about online privacy and security? With Passwall VPN, you can create a secure virtual private network that shields your online activities from prying eyes. Our guide goes beyond the basics, offering a detailed walkthrough that ensures you get the most out of this powerful tool.
From installation to configuration, our step-by-step instructions provide clarity at every stage. We understand that technology can be overwhelming, so we've crafted this guide to make the process smooth and accessible. Beginners will appreciate the straightforward language and visual aids, while advanced users can dive into the finer details of Passwall VPN customization.
Embrace the benefits of an OpenWRT router equipped with Passwall VPN. Say goodbye to geo-restrictions, safeguard your data on public networks, and maintain your digital privacy. Follow our guide today to unlock the potential of a secure and efficient VPN setup on your OpenWRT router.
Introduction
- Step 1: Open OpenWRT and navigate to the "Service" menu. Then click on "Pass Wall."
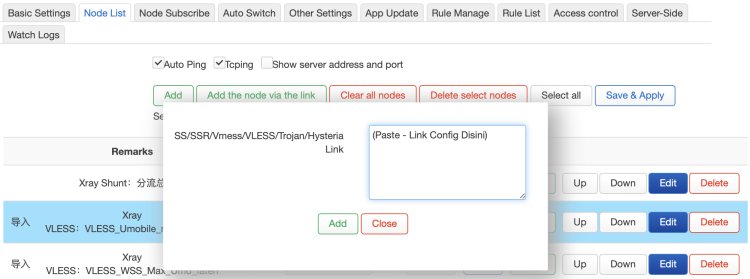
- Step 2: Within the Pass Wall interface, go to the "Node List" tab and select "Add the node via the link."
- Step 3: Paste the config URL/link provided by your VPN seller into the designated box and click "Add." For example, a vmess URL may look like thiS
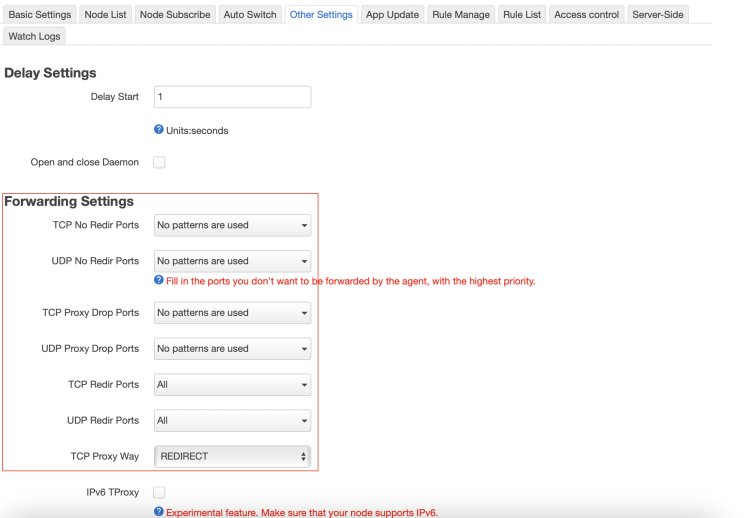
. Note: The above config URL is just an example and cannot be used.vmess://eyAidiI6ICIyIiwgInBzIjogInNzaHh2cG5fZG90eWNhdCIsICJhZGQiOiAiYnVnLmNvbS5teTAyLnNzaHh2cG4ubWUiLCAicG9ydCI6ICI0NDMiLCAiaWQiOiAiNmM4NzYzNGItNmI3Ny00ZmE3LTlmYjYtOGVmOWNhNTEyYTBlIiwgImFpZCI6ICIwIiwgIm5ldCI6ICJ3cyIsICJwYXRoIjogIi92bWVzcyIsICJ0eXBlIjogIm5vbmUiLCAiaG9zdCI6ICJteTAyLnNzaHh2cG4ubWUiLCAidGxzIjogInRscyIsICJzbmkiOiAiYnVnLmNvbSIgfQo= - Step 4: Switch to the "Other Settings" tab and navigate to the "Forwarding Settings" section. Make any necessary adjustments and click "Save."
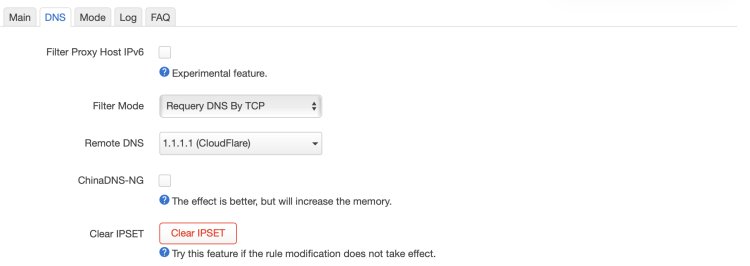
- Step 5: Proceed to the "Basic Settings" tab and select "DNS." Set the DNS for PassWall as shown in the accompanying image.
- Step 6: In the same "Basic Settings" tab, click on "MODE" and set TCP and UDP PassWall to "Global Proxy" as shown in the imag
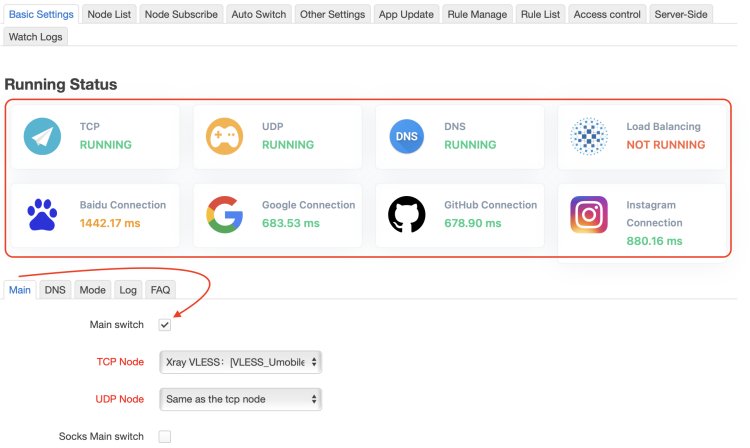
- Step 7: In the "Basic Settings" tab, click on "Main." Tick the box next to "Main switch" and configure TCP Node and UDP Node settings according to the instructions provided by your seller. The node names may vary depending on the information provided.
- Step 8: Finally, click on the "Save & Apply" button to complete the installation.
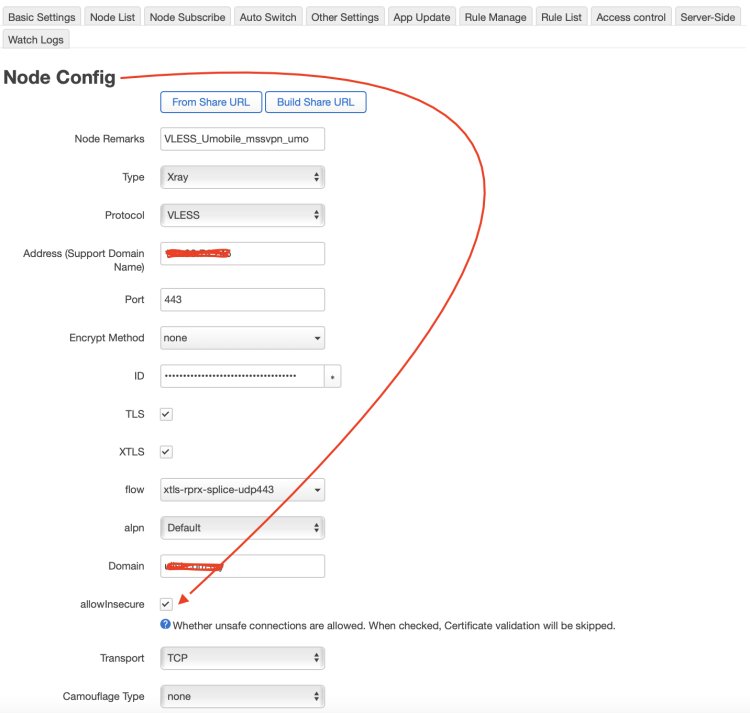
Important Note: If you are using the XTLS Config Protocol, ensure that you enable "Allowinsecure" by going to "Edit Node" -> "Node Setting" -> "Allowinsecure" as shown in the image.
Congratulations! You have successfully installed PassWall on your OpenWRT router. Enjoy the enhanced privacy and security provided by this powerful VPN bypass tool.
Please note that this guide is based on the specific instructions provided in the article. For further assistance or clarifications, you can refer to the official documentation or contact the MSSVPN support team.


